This is adapted from this tutorial (normally for University of Bristol CS students) to reflect what will be expected at The Pangean.
You are working on a software project. As your project grows, and you work on it together with other people, you will need some way of:
Git can do all these things. It takes a bit of getting used to, but it pays off to learn the basics of Git once and then use it again and again.
Git is not the only system that can do this, but it is the most popular one by far and knowing Git is pretty much a requirement for lots of technical job interviews as a developer. So you might as well learn Git.
On the other hand, Git’s manual is full of technical terms, some of which the authors made up themselves, and there are different ways of using git (called “workflows”) that have manuals of their own. The aim of this tutorial is to get you to the point where you can use Git productively, and understand some of these manuals if you need to.
There are three ways to use Git:
All three ways are different interfaces on the same set of Git “verbs” (or commands) so this tutorial will focus on these, but I will mention the free graphical client fork in this tutorial as that’s what I use myself.
Please do not let anyone tell you that “real programmers” only use the command line. It’s perfectly acceptable to use a graphical client if, like me, you’re more productive that way.
Unfortunately Fork doesn’t work on linux. On your own machine, type git in a terminal and if you’re lucky you’ll get the help text, showing it’s installed already. If you need to install it yourself:
On Windows, if you want to use the fork client then download and install it from git-fork.com. Fork comes with the command-line tool and there’s a button in the window to open a command line if you need it. If you want the command-line version of Git on its own then download and install Git for Windows.
On Mac, you first want to install Homebrew by opening a terminal and following the instructions on the page. Homebrew is a package manager, that is a piece of software that allows you to install other software. This is particularly useful for developers. Once you have installed Homebrew, open a new terminal and type brew install git and press ENTER. Then you can install fork from git-fork.com.
On Linux, you will not be able to install Fork, but you can install Git with the package manager provided with your operating system: sudo apt install git on Debian-based systems (including Mint and Ubintu) and sudo yum install git on Red Hat-based systems.
When you install Fork, it asks for a username and e-mail address. This is a feature of Git, not of Fork itself. It is not to spam you - each “commit” in Git is linked to an author so you can tell who last changed a file, and the developers decided to use name+email for this. You can just put “-“ as your e-mail address if you want and Fork will not complain. It doesn’t want to e-mail you, after all.
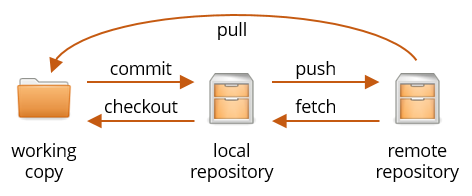
Git itself is a command-line tool that lets you manage repositories, which are like folders that track the complete history of everything that has ever happened in them. You always have a repository on your own machine, and you can have further repositories stored on a server.
For a typical project you will want a repository on a server, both as a backup of your code and as a way to share your code with others if it’s a team project.
There are three big online services that offer you free hosting of your own repositories, within reasonable limits:
All three services currently offer you an unlimited number (within reason) of private repositories, where only you or people that you allow can see the code. You can also make public repositories, for example for open-source projects or as part of your portfolio when you’re looking for jobs.
For the steps in this tutorial, and for hosting your first few projects, all three services are practically equivalent, and it’s easy enough to move a repository from one service to another later on so it does not matter which one you sign up with.
Kheeran: Please set this up using GitHub. I’ve altered the tutorial to reflect GitHub
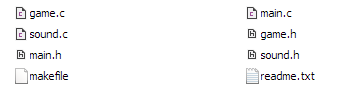
You are writing some code, and you have some files:
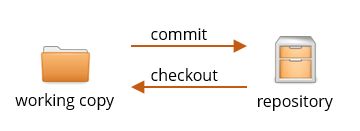
The code you’re currently working on is called your working copy in git-speak.
I will indicate the working copy with a folder symbol like this from now on:

This image and others in this tutorial are taken from the gnome-colors-common icon set which is released under the GNU LGPL version 2.
A repository is a database with the complete history of your code. I represent it with this symbol:

You work on your working copy with whatever tools you like, but you only talk to the repository through Git (and Fork, if you’re using it).
Copying code from the working copy to the repository is called a commit. You will do this a lot. Instead of creating a ZIP file of what you’ve been working on and e-mailing it to the rest of your team, you make a commit. Instead of copying the files to a USB stick to take them home, you make a commit.
The basic workflow is this: write or edit some code, commit to the repository, repeat. Your repository, or at least mine for the CNuT notes and exercises (Kheeran: FYI, this is a 2nd year computer science unit from the University of Bristol), then looks like this:
Each dot is a single commit, with the newest one on top. Git does not of course store a copy of your whole project for each commit; instead it only records the changes since the last commit so it doesn’t waste space.
Sometimes you want to copy code from the repository back to your working copy, for example to undo a change that broke something. This is called a checkout.
Summary so far:
Normally it’s quickest to create an empty repository on an online service and then clone it to your own computer.
New in the top left corner (green button).Initialise repository with a README box. Press Create repository.Code. The project URL is of the form https://github.com/USERNAME/PROJECTNAME.git where USERNAME is your GitHub username and PROJECTNAME is the project’s name with possibly small changes made to give a legal URL, like replacing spaces by dashes.File / Clone .... Put the project URL in the first box, choose a folder for the working copy and give it a name (this will become the name of the new folder containing your working copy).You have now got a working copy and a local copy of the repository in a folder on your disk (press the “curly arrow” Open in buttin in Fork’s toolbar to open the folder).
Your repository, which actually lives in a folder called .git inside the working copy folder, currently has one commit called initial commit with the readme file.
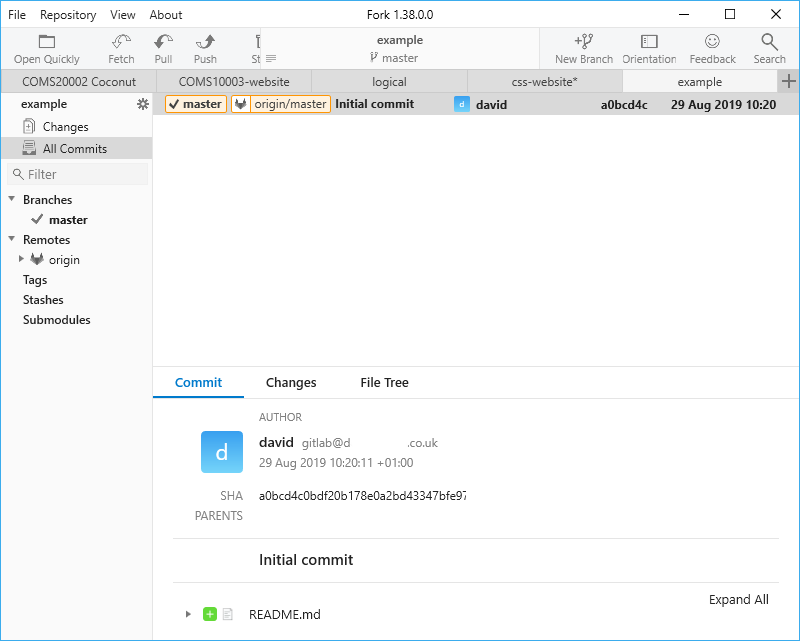
At the top you have the menu and toolbar. Repository / Open in Explorer, the shortcut Ctrl+Alt+O or, if you make the window wider, the “curly arrow” that appears in the toolbar opens a folder window for your working copy. Below the toolbar is the tab bar, with one tab per working copy - I currently have five tabs open.
On the left you have a list of various things - the top item “Changes” shows you if there are any changes in your working copy that are not in the repository yet. To the right is the main window which varies depending in what you select in the list to the left. Currently it is showing the details of the initial commit.
Here are some alternative ways to create repositories:
File / init new repository ....cd into it and type git init.git clone URL where the URL is something like git@github.com:USERNAME/PROJECTNAME.git. This creates a folder named after the project name, which you can safely rename or move around if you want to.git@ and uses a protocol called “secure shell” (SSH) internally, which works with public keys, so cloning your repository this way will only work after you have set up a key as described above. The second URL starts with https:// and this is a regular web connection, which you can use without keys. If you click the code button in GitHub, it will show you both URLs. If you’re cloning a public project, you can use the https one without any authentication at all; if you use https for a private repository that you have access too then git or fork will pop up a window asking for a username and password. Using SSH with public keys is the recommended way to use Git securely.Let’s make a commit:
Ctrl+Alt+O) and make a change, for example add a new file or edit the README.Fork now shows Changes (1) in the left bar to show that something has changed in the working copy. Click on that to see the change:
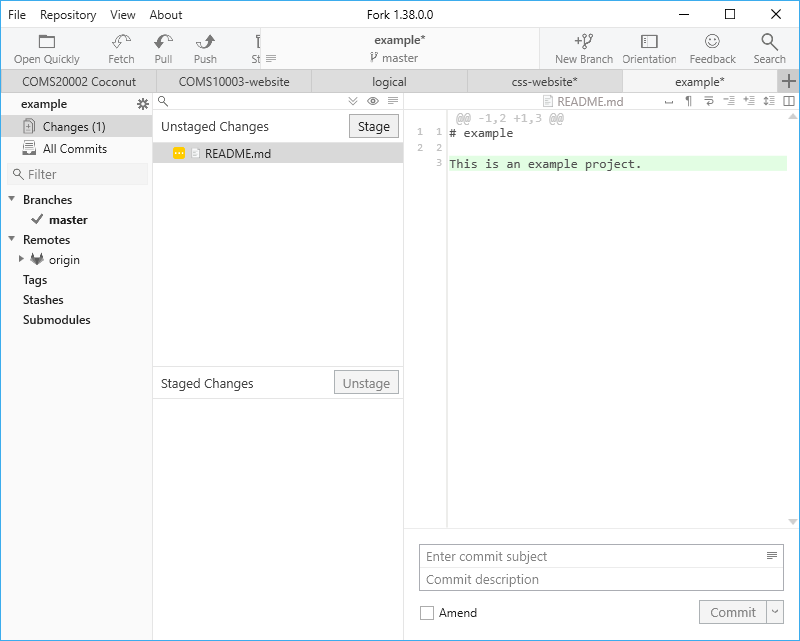
Under Unstaged Changes you see all the files that have changed since your last commit. Selecting one of these files shows you the file on the right, with lines that you added in green and lines that you deleted in red.
Stage. It moves to the Staged Changes section (if you had multiple files, you could click the first one and shift-click that last one to select them all, then stage them all at once).Commit 1 File, but it is currently turned off because a commit must have a message describing it. Enter a message in the box labelled Enter commit subject immediately above, then press the button.All Commits item in the list on the left to see your first successful commit: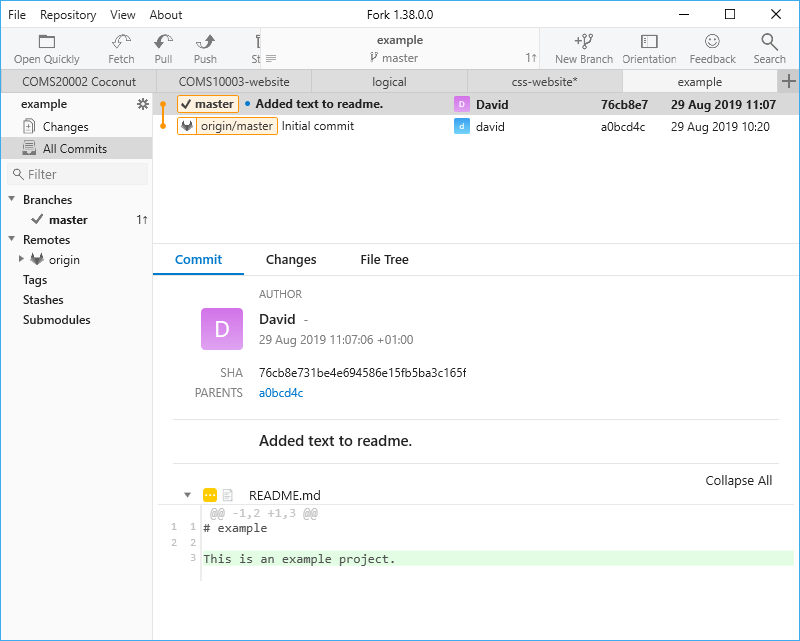
When you select a commit in the list, the bottom part of the window tells you the commit details. Each commit has a unique hash - a long random number that you need in some cases to identify a particular commit (if you’re using the command line). Below that you see the commit message (“Added text to readme” in my case) and the file(s) affected in this commit. If you click on the triangle next to a file in the commit screen, it expands to show you the changes in this commit. This feature is useful for browsing the history of your code to see what line(s) relate to what commits.
In the top window, notice that the latest commit (on top) has something called a tag attached that says master, whereas the one below has a tag origin/master.
On the command line, the process for committing goes like this:
git status to show what files have changed.git add FILENAME to add a file to the next commit. You can do git add . to select all files in the current folder that have changed since the last commit.git commit -m MESSAGE does the commit. If you leave off the -m flag, git opens your default text editor and you can type the message in there.Try and make commits
Here’s the example from my CNuT lecture notes again (which you’ll be able to look at in more detail in a moment):
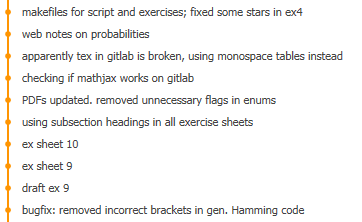
This can be really useful later on to search for “how did I do that again?”. Imagine you at some point add a “reset” button to a form on a web application you’re making, then later on you have another form where you also need a reset button. If you can search for commits with the word “reset” in the description (with the magnifying glass icon to the very right of the toolbar) and find the last time you did this, then you can quickly apply the same technique to the new form you’re making.
So far, you have a folder with your working copy (currently with one file README.md), a repository (in the subfolder .git) called the local repository and another repository hosted on GitHub called the remote repository.
When you make a commit, you copy files from the working copy to the local repository. This neither counts as a back-up, nor does it help you share code with others.
To work with the remote repository, we need to introduce to new terms:
The idea is that the local and remote repositories are always kept in sync. Fetching is a safe operation in that it cannot cause conflicts, even if someone else has changed code in the meantime. Pulling is not safe in this sense, so the recommended workflow for starting out with Git in “single-player mode” is:
As long as you always fetch before you start working and commit+push before you finish, you will never have a Git conflict as long as not more than one person is working on the same project at a time. For teamwork, see later in this tutorial.
If you’ve followed the tutorial so far your window will have a part like this:
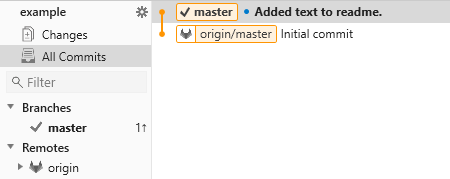
Under Branches, you currently have one default branch called master which you can interpret as “the latest commit”. You can see on the right that the master tag is on the latest commit.
Under Remotes, you can see one entry with the default name origin - this is the repository on GitHub. On the right, you can see that the origin/master tag is still on the initial commit: the remote is one commit behind the local repository. This is also shown after the master branch entry with the one followed by an arrow pointing up (pronounced: “1 up”). If you saw for example “3 down” it would mean that the remote is 3 commits ahead, and if you see both for example “1 up 2 down” then it means that you have made commits to the local repository and someone else has meanwhile made commits to the remote one, a situation that we’ll deal with later on.
origin and choose Fetch 'origin', press fetch in the dialog box. If anything has happened on the origin in the meantime, you will know this now.master and choose Push 'master' to 'origin'. Accept in the dialog box.origin to show its master branch, right-click that and choose Pull 'origin/master' into 'master'.You can also use the fetch, pull and push options in the Repository menu, then select the branches you want in the dialog box that appears.
On the command line, the commands are git fetch, git push and git pull.
If Git isn’t sure which branch or remote you mean, it will give you a message telling you how to select a default one. If you want to manually select a different one, you can do git fetch origin/master or git pull origin/master master to tell Git exactly which branches you mean.
You can clone other people’s repositories if they have made them public. Select File / Clone in the Fork menu and put the following in the URL box: https://gitlab.com/david-bristol/coconut.git. Choose a name and folder anywhere you like. This will get you the sources and PDFs of all the material for the CNuT unit, as well as the complete history of how and when I developed it. Have a look at some of my commits.
Kheeran: Checkout https://github.com/kheeran/COMS30005-HPC-Serial for an example of my commits. Click 82 commits.
You will be able to make changes to your working copy and your local repository, but you will not of course be able to push changes back to my Gitlab repository.
Note that the URL starts https instead of git. When you clone someone else’s repository, this is fine as it means that you do not have to authenticate yourself or even have an account with the service. For your own repositories, although you could use https and type your username/password each time, it is more secure (and less annoying) to use the git URL scheme, which uses keys instead of passwords. See “Security” earlier on for details.
It can happen to the best of us: you’re working together on a project and two people edit their own copies of main.c at the same time. When it’s time to combine everyone’s work for the day, you risk one person’s changes overwriting the other person’s changes. Git calls this situation a conflict, and one of the reasons to use tools like Git in the first place is to help you solve code conflicts. (Git cannot unfortunately solve personal conflicts for you.)
Git solves conflicts by manipulating time. Instead of a time-line where one event happens after another, Git has a time-graph where different timelines can split and join again.
First, let’s imagine the following situation: two people are working on their own working copies of the same repository. Person one adds a file A.txt and commits it, person two adds a file B.txt and commits it. So far, everyone has just committed to their local repository and no-one is aware of the others’ changes yet.
Person one pushes her changes to GitHub (a.k.a. “origin”). So far so good - GitHub doesn’t know about the other change yet.
But when person two tries to push, they’ll get an error message:
error: failed to push some refs to 'git@gitlab.com:david-bristol/my-project.git'
hint: Updates were rejected because the remote contains work that you do
hint: not have locally...
The first rule of “multiplayer Git” is that you can only push if no-one else has changed the repository since your last fetch. If you get this error, do a fetch instead:
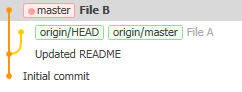
The timeline has split into two: after “updated README”, someone else made a commit “File A” and you made a commit “File B”. (The list on the left will show 1 up, 1 down to indicate this situation too.)
If you hit this situation, and the two commits do not directly conflict with each other (that is, you didn’t both edit the same file - you can see which files were changed by clicking on a commit and then looking at the bottom of the window), then what I recommend you do is
rebase instead of merge box in the window that pops up.I should warn you that some people on the internet have strong opinions about this, and that I will continue to ignore these people.
What rebase does is pretend that you’d done a fetch before making your changes, so the repository after the push looks like this:
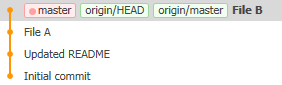
Everything’s fine again.
Kheeran: In this case, inform me and we will discuss how to merge the conflicts. Ultimately, I will do the merging unless I specifically say otherwise.
It is always safe to try a push. If it doesn’t work, do a fetch instead and see what happened. Clicking on a commit shows you which files were changed at the bottom of the window. If two people changed the same file, you have a real conflict.
In this case, try and pull but do not tick the rebase box.
If you try and pull (whether or not you tick the rebase box) and you have a real conflict - two people edited the same file - one of two things can happen. If Git thinks it can tell what’s going on, it will try and combine both your changes to the file. If Git doesn’t know what to do, you get an error with a line like
CONFLICT (content): Merge conflict in README.md
Close the error message and open the file in question. Git has indicated your edits with markers like this (you can search for <<<<< to find them):
<<<<<<< HEAD
edited by person two
=======
edited by person one
>>>>>>> b550ec8bac847dc5ef2b731e30ff18a359b2d582
This means that you, person two in this case (HEAD), added the line edited by person two but someone else added the line edited by person one (the id of their commit is provided in case you want to look it up on the console, but in Fork it’s obvious which commit is meant).
Fix the file, remove Git’s markers and go back to Fork. You get this warning:

If you’re happy that you’ve fixed the conflict, Resolve takes you to the commit window, where you can stage your changes and commit (Git has created a default commit message for you, which you can edit if you like). Abort gets you back to before you tried to push.
Your timeline now looks like this:
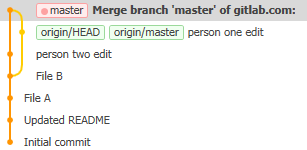
You can now try and push again, and if no-one else has changed anything in the meantime, the push will go through and the green tags will move to the top commit.
When two timelines that have diverged join up in a single point again, this is called a merge.
A bit of explanation on what’s going on here. A commit is a data structure with the following information:
Normally, most commits have exactly one parent, except the initial commit which hase none. As long as you do not have any conflicts, your git repository is basically a linked list of commits (in the Fork graph view, a dot is a commit and a line leaving a dot downwards is a parent pointer). New commits get added at the start (top) of the list. In general, the repository is a DAG (directed acyclic graph) of commits.
However, when two people work on the same repository independently of each other and then commit, you get two commits with the same parent.
Some people maintain that you should never change a node once it has been added to the commit graph. In this case, every time you get two nodes with the same parent, you need to make a new commit with two parents called a merge commit to get the same latest version of the code for everyone again.
I disagree - if you do this all the time, then in the worst case 1 in every 3 of your commits will be a merge commit. As long as you have two commits that didn’t edit the same file, there’s no reason not to use the rebase feature: what this does is undo your last commit, fetch from the remote repository and then apply your last commit again. This makes the repository easier to browse when you’re looking for something. Rebasing is completely safe and won’t lose your changes.
If you have a genuine conflict in a file, it’s worth using the more complicated “merge commit” strategy, as in the merge commit you might want to make changes to a file that weren’t in either of the previous commits. For example if person one adds edited by person one and person two adds edited by person two, then you might want the final line to read edited by person one and person two.
So I suggest using a merge commit (pull with rebase off) only when you really have a conflict because then the merge commit itself contains useful information.
It’s not illegal to do a rebase after resolving a conflict, but if your fix for the conflict was to delete something you wrote in the last commit then a rebase would lose this information, and you would be better off keeping it recorded in the repository in case you want to refer to it later.
For team projects, I recommend the following workflow:
Resolve button to create a merge commit, then try and push again (with rebase off). If this succeeds, you’re done, otherwise go back to step 5.A reminder of the Git commands we’ve learnt so far:
It’s time for a closer look at those labels like master, which are called tags in Git-speak.
You can imagine that every repository has a table of tags, where each entry contains a tag name and a commit id. When you create your first commit, Git automatically creates a tag called master and points it at that commit; when you create a new commit then Git changes the master tag to point at that commit. We’ll see later on that this is not always true, but it’s close enough for now.
The only tag that Git requires in every repository is called HEAD and it points at whichever commit your working copy is based on - which so far just means the latest commit too. Fork doesn’t show the HEAD tag directly, instead it displays the HEAD commit of your local repository in bold. master is just a convention, but one employed by pretty much every repository out there.
Tags are part of a repository, so if you have a local and a remote repository then their tags can differ, as we saw on the last pages. Making commits, pushing and pulling (but not fetching) can move tags around too.
You can create your own tags, and Git won’t mess with them. For example, if you want to release version 0.1 of your project, you can right-click a commit and choose Create New Tag, and give it a name such as “v0.1” and an optional message. Your custom tags are basically human-readable names to refer to particular commits.
When you create a tag, it lives in your local repository. Tick the Push all tags box next time you push changes to copy it to the remote; a fetch will automatically fetch tags. (The reason for this convention is that on a group project, an individual member might want a “private” tag on their local repository that others can’t see, but tags that end up in the remote are assumed to apply to everyone.)
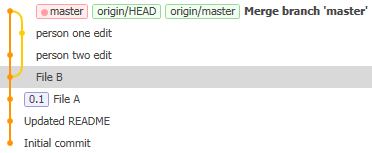
In this image, the HEAD commit of the local repository is the one in bold (at the top), master is a local tag, 0.1 is a user-defined tag and the tags origin/HEAD and origin/master are from the remote repository called origin.
Tags can do much more than this, as we’ll see next.
Branches are what Git is really about. Git lets you do pretty much whatever you like with branches and there are lots of different workflows that use them in different ways. You don’t have to follow any of these until you’re experienced enough and have a project big enough that it makes sense for you.
There are two points to understand: what a branch is, and what a branch does.
A branch is simply a tag that Git moves for you when you create a new commit. master is, and always was, a branch tag.
At any point in time, your working copy is on exactly one branch. When you make a commit, Git moves the current branch tag to point at your new commit.
HEAD is a special tag in that it doesn’t point at a commit directly, it points at the current branch tag. So in a repository you have the linked list HEAD -> (current branch) -> (latest commit on this branch).
Branches let you work on different versions of your code at once without conflicts. Imagine a web project with some HTML files, some stylesheets and a server written in Java. Danny the designer is working on the HTML and CSS while at the same time Charlie the coder is adding new features to the server. With a single branch, every time someone wants to push to the repository they have to rebase or resolve conflicts manually, and worse still the commit history is a complete mix of Danny’s and Charlie’s work.
Instead, Danny can create a new branch called “design” and work on that, meanwhile Charlie creates a branch called “server” and works on that. After a few commits, the repositories look like this:
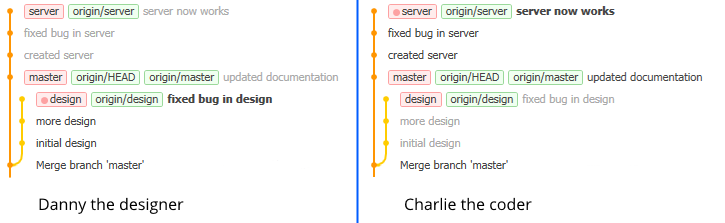
In Danny’s view, design is the current branch (pink dot, latest commit (HEAD) in bold). Danny has made three commits on this branch, meanwhile Charlie has been wokring on the server branch and made a few commits there. The order of commits in the list is by date (latest on top) and commits on other branches than the current are shown in gray text. Charlie’s view of the repository is the same, but she’s currently on the server branch so the HEAD pointer on her local copy of the repository is on the “server now works” commit.
As long as Danny and Charlie work on different branches, they’ll never have a conflict, but at some point they will want to combine their code so they meet up at the end of the day to do this.
How and when to merge depends on how you’re using branches. You can have one branch per feature and merge them into master when they’re complete, or one branch per person (and occasionally further branches for trying things out), or many other things.
Danny and Charlie have decided to do their own work on branches called design and server and to merge the results into master every now and then.
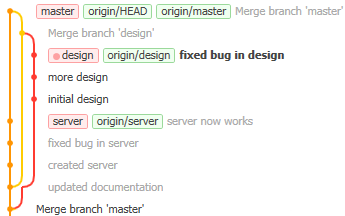
design.master branch and chooses Checkout 'master'. This switches her current branch to master, and her files in the working copy change to those of the master branch. (Her recent design work has temporarily disappeared in the working copy, but it’s not been lost - it’s still in the repository.)design branch and chooses merge into 'master'. You always merge into the currently selected branch. Git is happy and says The branch can be merged without conflicts. (If there was a conflict, Danny would resolve it as described on a previous page.)Charlie does the same, and so the commit graph looks like this:
This is Danny’s view on the design branch. The three branch tags are all on the same commit as the respective “origin” tags, showing that all local changes have been copied to the server. (To see if there are new changes on the server, Danny would do a fetch.)
Once the commit graph gets complicated, you can hover the mouse over an entry in the Branches section of the list on the left and two symbols will appear: the star marks a branch as “favourite” and the axe-thingy hides all other branches from view in the main window, so you can look at the commits on your current branch only (click the axe-thingy again to show all branches).
One strategy to work with branches is called “feature branches”: for each new feature, you create a branch, implement the feature and then merge it into master when it’s done. This way you only ever have to merge from feature branches to master and not back again.
In our example, when Charlie continues working on her code, she might want to have it display Danny’s latest HTML page, so Charlie needs a way to get Danny’s work into her own “server” branch. She can do this by:
checkout 'server').master branch and choosing merge into 'server'.Charlie can now carry on coding the server. However, next time she merges into master, she might get a conflict if Danny’s updated the HTML files again - in this case she has to resolve the conflict by taking Danny’s latest version.
While merging from “work” branches into master is normal, merging from master into other branches is worth avoiding if you don’t have a good reason for it, but you can do it if you need to.
On the command line, git checkout OBJECT does a checkout, where OBJECT can either be a branch or the hash of a commit. To create a new branch on the command line, you use git checkout -b BRANCHNAME. The merge command is git merge OTHERBRANCH.
Sometimes, you don’t want all your files to be included in the repository. For example, if you’re compling a C program the traditional way, you definitely want your source files (e.g. main.c, main.h) in the repository, you might or might not want the executables such as main.exe in the repository, but you definitely don’t want temporary files such as main.o stored in the repository - these are created and updated by the compiler.
To ignore some files, make a file called .gitignore in your working copy - the first character in that filename really is a dot - and open it in any text editor; place one filename or pattern (with * to mean “anything”) per line in that file. For example, for a C program, place *.o in the ignore file.
If you’re working with TeX then there’s so many kinds of temporary file that someone has helpfully written an ignore file for you.
You can ignore whole folders too - if you put a line private in your ignore file, and you have a folder of that name, then Git/Fork will consider the whole folder off limits and not show changes to files in that folder in the (un)staged files view. (This is why you won’t find the solutions to the CNuT exercises in that repository.)
The .gitignore file itself you want to stage and add to the repository along with your other project files.
If you want to know more about Git, you can
git COMMAND --help or just git --help on the command line to read the instructions.The Git reference manual is written in a style that’s not everyone’s cup of tea, and lots of people find it a bit intimidating (the book, in my opinion, is more beginner-friendly). So someone has created a fake random Git manual page generator which perfectly emulates the tone of the real thing, while making no sense at all.
Kate Hudson’s “Git flight rules” is a good resource for Git FAQ.
And finally, a bit of programmer humour:
(Copied from http://abload.de/img/in_case_of_fireirrtb.jpg. This should be obvious, but as a fire warden I feel the need to point out that in case of a real fire alarm you must leave the building immediately by the nearest emergency exit.)
Altered from the tutorial by David Bernhard available at the University of Bristol’s CSS website